
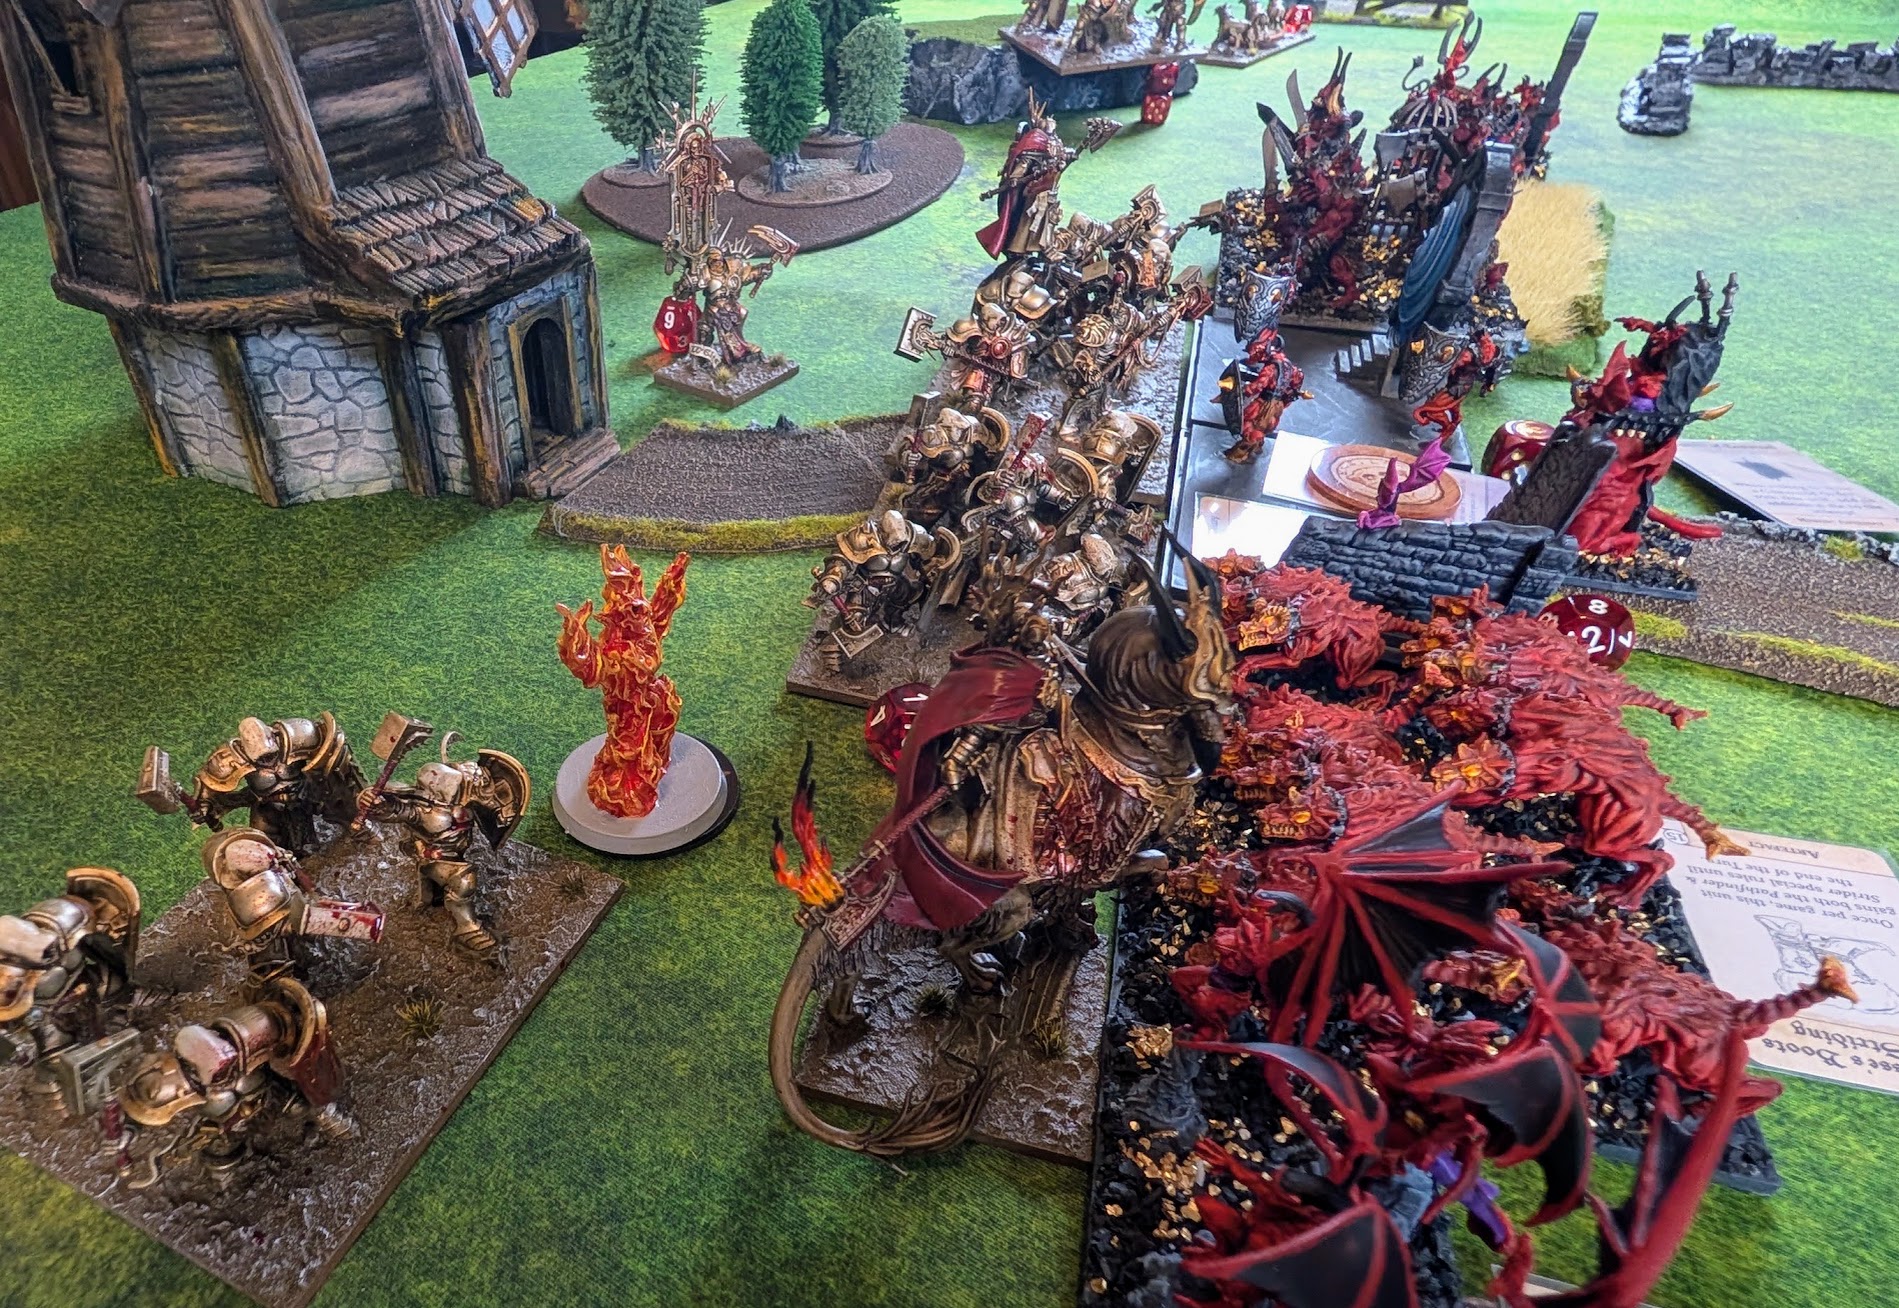
The following battle was played as part of the living campaign Siege of Samarik on August 15th 2026.
The proud city of Samarik has been weathering a constant wave of attacks from the east. Scouts report of a small Abyssal flanking force coming from the west attempting a rear attack. Gnaeus leads a small elite force to quickly ride out and crush this flanking force before they can pose a larger threat.
The game was played at 2000 points. The terrain was set up as layout #2 (p. 65) with Long Edges deployment (p. 66) playing Scenario #11, Loot (p. 71).
The setting is a small farmstead that is still standing on the outskirts. Gnaeus and his force are trying to grab as many supplies to bring back to the castle as possible, while the Abyssal invaders are trying to plunder and steal the same supplies.
For this game I was playing as the Forces of the Abyss and my opponent took the Basileans. A classic matchup.

Basileans 2026 [2000 / 2000]
~ List Valid ~
Battalion 1
Gnaeus Sallustis [U] (Hero (Lrg Cav)) 1 [240]
Dictator [2] (Hero (Inf)) 1 [180]
– Banner of Command [20]
Paladin Foot Knights (Inf) Regiment [170]
Paladin Foot Knights (Inf) Regiment [170]
Paladin Foot Knights (Inf) Regiment [170]
Paladin Monster Slayers [U] (Inf) Horde [255]
Gur Panthers (Cav) Troop [95]
Gur Panthers (Cav) Troop [95]
Elohi (Lrg Inf) Regiment [330]
– Brew of Strength [40]
Elohi (Lrg Inf) Regiment [295]
– Fire-Oil [5]
This list features a solid infantry core with lots of speed in support. Gnaeus is speed 9 who can support the 4 speed 10 units. Both of the Elohi units will be hitting at crush 2 this game due to their magic item support.

Abyss Warlocks Archfiend [2000 / 2000]
~ List Valid ~
Battalion 1
Archfiend (Hero (Ti)) 1 [330]
– Gruesome Host [0]
– Staying Stone [15]
Warlock [2] (Hero (Lrg Inf)) 1 [185]
– Banner of Command [20]
– +The Dark Pit+(2) [30]
Warlock [2] (Hero (Lrg Inf)) 1 [215]
– Amulet of the Fireheart [15]
– Bastion(3) [35]
– Scorched Earth(3) [30]
Lower Abyssals (Inf) Regiment [100]
Lower Abyssals (Inf) Regiment [100]
Gargoyles (Hvy Inf) Troop [120]
– Helm of Confidence [15]
Hellhounds (Cav) Regiment [190]
– Sir Jesse’s Boots of Striding [15]
Abyssal Guard (Inf) Horde [320]
– Brew of Strength [40]
Molochs (Mon Inf) Regiment [220]
Molochs (Mon Inf) Regiment [220]
This list manages 3 hammers in only 2000 points, with an Abyssal Guard Horde and 2 Regiments of Molochs. Then there are a number of chaff support pieces, and 3 characters to provide buffs to the three hammers.
Pre game analysis:
Sadly I knew as soon as I saw both lists that this game is over at the list writing stage. Two of my regular opponents play Basilea and I also play with them occasionally. I have played the Abyss vs Basilea well over a dozen times since Fracture came out. The Abyss list that I took has no ability to interact with the enemy army. If these lists were to face each other 20 games in a row, the Basileans should win 19.5 of the games.
The two Elohi regiments are a hard counter to the list that I took. They out range all 3 of my hammers by a significant margin, and the only unit in my army that can reliably survive even a front charge from them is the Abyssal Guard Horde. The Elohi can and should pick up two of my units a turn from turns 2 or 3 through 6, and there is nothing the Abyss can do to stop them.
Setting aside the Abyssal Guard for second, let’s look at my second toughest unit, the Molochs. The Molochs only have a 12” threat range to the 20” of the Elohi. My opponent gets 3 orders at 3 command dice, so should have elite on any charging unit of Elohi. Assuming a basic front charge, 20 attacks hitting on 3s with elite should hit 17.7 times, and then wounding on 2s should get 15.2 wounds. Assuming the Elohi roll within a standard deviation, and rounding out fractions because dice roll whole numbers, we are left with an expected damage range of 13 to 17 wounds on a simple front charge.
Molochs have a nerve of 19+, so the Elohi should expect a break test somewhere in the range of 6s twice (52.6% success) to 3s twice (95% success) or an average of about 73%. And that is for a YOLO solo front charge, any combo charges obviously push the success rate higher.. Things are bit better for the Molochs if the opponent takes a hindered charge, dropping the hits down to 13.2, and an expected damage range of 9 to 13, looking for 10s (2.7%) to 6s (52.6%) for a rough average to break on a solo charge of only 27%, call it one in 4.
The issue is because of the huge disparity in threat range, the Elohi can set up or take the charge that most benefits them. And the Molochs are the best second unit I have, the numbers shift considerably more in the favor of the Elohi for every other unit.
The reason this is so un-interactive is because the Forces of the Abyss lost their only reasonable long range hammer. In 3rd edition Abyssal Berserkers moved 9” to the Elohi 10”, and the two had very similar nerve and damage output (depending on other support pieces, items, spells, etc.). The Berserkers were a bit cheaper than the Elohi, but the Elohi had arguably a better suite of keywords. These two units both could threaten each other, and there were legitimate duels between the two sides without a clear outcome before the game started.
The 4th edition Forces of the Abyss lost the ability to actively interact with the Elohi regiments. The only speed 10 unit in the roster is Gargoyles, who only average 1.5 wounds against the Elohi nerve of 18+ (0.077% chance of doing an extra D6, less than 1%). and can typically be completely ignored by iron resolve. The only remaining speed 9 unit are Hellhounds, who on a turn when they use Sir Jesse’s only average 6 damage against the 18+ nerve (also only a 0.077% chance), and only 4 damage on turns they don’t get thunderous. It is possible but not easy to set this up, and as the Abyss player, even when you get it off it is unlikely to do anything.
This means you are left with characters, who have very bad output per point. The individuals can’t multiply their attacks, and several only have 6 attacks to begin with (best outcome of all hit and wound of same .077% chance of success).
The Archfiend which I took is one of the best options, and while being more expensive than the Elohi are also miserably bad against them. An Archfiend averages 6 hits and 5.8 wounds with Brutal 1, taking the nerve test to 11s twice (1 in 144 or 0.69% chance of success, still less than 1%). This is remembering that the Elohi are as fast or faster so in general will get to choose the matchups.
When one side has a 73-95% success rate and the ability to choose the engagements, and the other side has a sub 1% success rate that is where this falls into hard counter territory. In this matchup the Elohi are invincible death stars that can operate freely and pick up whatever unit they want while never being under threat even if they allow the Abyss to charge them. Now Elohi aren’t invincible in the game overall, in fact I would say they are at best average. The reason for this is what all the non-Abyss armies bring, and they are weak against the two most common archetypes in competitive lists. Elohi are very bad against dedicated gunlines, and average at best against horde spam where they can’t one shot the enemy.
Elohi have very bad nerve (and unit strength) per point, in fact they are one of the worst units in the entire game on this metric. This makes them the prime target for gunlines and especially war machines with high pierce values, where the Elohi are easy to devastate and remove from the game, and where the minor healing from iron resolve is of little use. Salamanders running 4 Komodons are killing a regiment of Elohi every other turn assuming there is no other shooting to put additional pressure on the Elohi (like an obligatory Blizzard caster).
The weakness to gunlines is of no use to Forces of the Abyss whose fireball/firebolt shooting options are short range with almost no piercing. This is not a way that Forces of Abyss can win against Elohi.
The other weakness is where the Abyss CAN win, however. Regular hordes of almost any army are much cheaper, with higher unit strength than Elohi. They can hold objectives, and typically will have a defensive profile that does not allow the Elohi to kill them on a charge. If the Elohi are ever stuck in combat their low nerve per point makes them vulnerable to an enemy moving into position and destroying them with slower hammers.
The Forces of the Abyss have the perfect unit for this, an Abyssal Guard Horde. Buffed Abyssal Guard Hordes can routinely survive a double front charge by Elohi regiments, and can pick up an Elohi regiment per turn on the counter attack. Now an Abyssal Guard Horde at speed 5 can never force the issue, instead waiting around for the win condition to get desperate enough for the Basileans that they choose to charge these hordes anyway.
If I had taken 3 Abyssal Guard Hordes this game is mine to lose, and my opponent will struggle to kill one horde. I didn’t take that list for two reasons. First, I knew we would be taking pictures and I don’t have 3 abyssal guard hordes table ready to make the game look good visually. Second, I have played the 3 or 4 Abyssal Guard Horde lists into lists like this many times. It is uninteractive in the opposite direction. The math on a charge never works in the Basileans favor, and it is a ticking clock for them before they just lose.
While 3-4 Abyssal Guard Hordes is an almost sure path to victory for the Forces of the Abyss, it is dreadfully boring to play with. Even worse than just watching paint dry. At only speed 5 you have to wait for the opponent to make an ill advised charge into you. You spend the whole game standing there and pivoting to cover charge angles until you just win. It is just a stat check army which only a couple armies can ever hope to pass and gives the opponent nothing to do.
I have also played this matchup as the Basilean side. If the Abyss does not load up on Guard Hordes, the whole game is just taking candy from a baby. You have no risk of losing, and the ability to carve up your opponent however you want whenever you want. As the Basilean player the challenge is to crush the opponent while still giving them something to do so the game doesn’t feel so bad for them, because not only can they never reach your Elohi, even if they do they can’t hurt them. Typically what I like to do is feed my poor opponent a few easy infantry kills so that they felt like they did something, while I know they always had no chance to win.
So, at the list writing stage, either the Abyss player loads up on Guard Hordes and gets an uninteractive win, or they don’t and the Basileans load up on Elohi regiments and they get an uninteractive win. This is not the fault of either player, this is a problem of balance in game design. It is tragic as well, because Abyss vs Basilea should be a classic matchup. And it used to be in 3rd edition when there were engaging clashes and a delicate dance between Berserkers and Elohi.
Now even though I know this game is lost before I start I want to be part of the living campaign. I’m more than happy to give my opponent the easy win here. I do have one good unit in my list, and they should be holding a token at the end of the game for a morale victory. Because I know this situation going into the game it informs the choices I make, so I’ve included this here as relevant context into my decision making.
Deployment:

After deployment I have ended up with a refused flank where I am deployed in the middle and the right but with nothing on the left flank. My opponent cleverly forced me into this. He had the last drop of deployment so he could put his second Elohi horde anywhere. His second drop of 10 was to put one Regiment of Elohi out on the right flank by the lake. At this point during deployment I had only deployed in the middle, but I had placed my Guard Horde which is my only good unit.
The problem this presented to me is as soon as that horde is down I have to be worried that his last drop is the Elohi on the left flank. Because I only took one Guard Horde, he could threaten them with an Elohi unit from both sides. That means that either I keep one unit of Elohi in the front and give the other a rear charge, or I have to spend a lot of the game trying to defend both flanks from his invincible death stars. I would be able to manage that for a turn or two, but not the whole game. If I had at least two Guard hordes I could play them back to back to protect each other from the rear charge, but with only 1 horde my options are severely limited.
While I am fine with losing, I don’t want to be tabled. If he puts Elohi on both flanks he will cruise through my army at lightning speed and can force me into a position where I lose my only good unit. So with his second drop I am forced to tighten up and try and put lots of units out on the right to look threatening hoping that he decides to over commit to that flank. To an extent my plan works as he ends up with Gnaeus and both Elohi also on the right. This is great for me as it only gives him one lane of attack into the middle into my Guard Horde. He does put a unit of Gur Panthers on the left, and later he also adds one unit of paladin infantry out there. With only the monster slayers and a regiment of paladins in the middle my opponent has essentially conceded the middle token to me.

Forces of the Abyss Turn 1:
Basilea wins the roll off and obviously gives the Abyss the first turn. It makes sense narratively as well, the Abyss are invading the farmland and the Basileans are arriving second just in time to defend.
So, looking at the board my thought is that the central token is going to be mine regardless. I have really no way to hold the token on the right with his Elohi. I would like to go for the token on the left but I have a problem. As soon as I pivot my Molochs or Hellhounds to threaten the left, my opponent can just turn his Elohi near the windmill to the left and march full speed. This will give him both flank tokens for sure. As long as he deployed both Elohi on the right, I want to try and delay him and keep him there on the right.
So, while I want to move to the left, I have to be patient and wait to move to the left until after the Elohi in the middle right commit to killing something on that flank. I do move one regiment of lower abyssals to face the left, thinking that they pose so little threat they won’t cause my opponent to react.
Given the situation I just move up in the middle getting ready to grab the easy token. I move up on the right. I move my regiment of lower abyssals up on the hill and give them Ultimate Betrayal. With all of my units in counterattack position I don’t expect my opponent to take the bait, but it doesn’t cost me anything and it gives my opponent the opportunity to make a mistake and charge. I don’t have any ability to impact him at range, so that is the end of my turn.

Basilea Turn 1:

Basilea starts by jockeying for position. On the left the Gur Panthers move up and grab the token. Their paladin escort also marches up to threaten anything that goes that direction. In the middle the monster slayers take a normal move through the forest, while the regiment of paladins in the middle marches to be in threat range of the middle token.

Most of the interesting moves are on the right. The panthers on that flank march up, as do the regiment of paladins to screen. Gnaeus sits unbothered behind the paladins. Both Elohi hordes move slightly, but angle to mostly give them attack routes onto the right. The Elohi horde near the windmill does have sight into the middle so still has a lot of options.

The real heroes of the siege are the gur panthers out on the left flank.
Forces of the Abyss Turn 2:
Going into this turn I have a lot of choices and in hindsight I don’t know if I made the right decisions.
First off, I need to consider the middle. I know my Abyssal Guard horde is going to move forward and grab the token, there are no charge targets within 10”. Once I do this my opponent will have 4 units that can hit the front of the Horde, but can only charge with two of them. He has the Paladin Monster Slayers, the Paladin regiment, Gnaeus and the Elohi regiment by the windmills. His only real chance of breaking my horde here is if the Paladin Horde and Elohi regiment both commit. On average I still live, so this charge is probably a mistake.
The only way I can win this is if my opponent makes a mistake and charges his Elohi into the Guard Horde. But if he doesn’t do that right now he is not going to break the horde this game. So I decide my top priority is to cast Scorched Earth on the Elohi near the windmill, and give him a tempting charge hoping he makes the mistake. My Molochs position to hit whatever goes for the Guard Horde, and the Hellhounds move to threaten the middle or the right flank on a counterattack.
Given the position of the Elohi by the windmill I am still very much in danger of him just marching full speed out to the left and ending the game, so while I don’t want to I feel I have to be cagey for another turn. In hindsight I think this turn I should have just marched my Hellhounds to the left this turn, and gambled that he wouldn’t give chase.
On the left my abyssal regiment can’t survive a charge from the paladins that are screening the panthers. I decide to just make a normal move and then give the abyssals fireball. The gur panthers are weak with low nerve, so I figure I have a chance at wavering them here which might let me grab the token later. I do get the fireball order off.
On the right my situation is worse. My opponent significantly out ranges me and I have no ability to engage. Both Elohi Regiments and Gnaeus threaten the Molochs in the woods, and on average any two of them will one shot the unit. With kill reactions that could leave them mostly behind my lines facing into the middle and left side.
I figure that at this point the Molochs are already dead, so I charge the Gur Panthers with them. I want my opponent more focused on the right than on the middle. While the Molochs will never live to see combat, my thought is that they are tempting bait that he will have to commit to. I perhaps should have just retreated the Molochs to try and delay another turn, but it is a losing cause no matter what I do. The warlock on the right moves into range to cast scorched earth on the Elohi by the windmill.
I make a mistake here in that I move the lesser abyssals on the hill onto the token before moving my Archfiend to see if I got Ultimate Betrayal off. Then to teach me the lesson of my mistake, of course when I move the Archfiend she fails on Ultimate Betrayal.
My final decision is on the Gargoyles. I can either pivot to the left and march behind the warlock, leaving the warlock as a target but putting the Gargoyles in a great position to chase the right Gur Panthers. Or, what I decided to do, was pivot them and move to screen the warlock, giving it another turn to cast. I make them a very tempting target by exposing their flank to my enemy. My plan here is that I both screen the warlock and leave Basilea with a lot of targets on the right so they don’t crack the middle or move left.
While I am exposing several units, none of them have any chance to ever impact the Elohi, and I really want my opponent to commit to the right.

The casting phase starts out right. My warlock on the right uses amulet of the fireheart and casts both scorched earth on the windmill Elohi and Bastion on the Abyssal Guard. My warlock in the middle casts the dark pit. However then my lower abyssals roll terribly on their fireball and only manage a single wound on the left panthers.

The Molochs easily kill the Gur Panthers, and then turn to face his army, hoping that they are tempting enough bait. My thought is that given the range advantage of the enemy they were dead either way.

Basilea Turn 2:
The forces of Basilea decide not to gamble the game on taking down the Abyssal Guard. They instead charge both the Monster Slayer Horde and the Paladin Regiment into the Guard. The hindered windmill Elohi go into the lower abyssals on the hill, the Elohi by the lake and the paladin regiment go into the hapless Molochs, and Gnaeus takes an easy flank charge on the Gargoyles.
At this point in the game I’m pretty happy that my opponent has committed to the right. During movement he casts elite on a bunch of units. I do really wish my abyssals on the hill had gotten ultimate betrayal off as I wanted to buy another turn.

The combat phase starts off normal enough. The Molochs who were doomed to die, do in fact die and it isn’t close (26 wounds taken vs 19 nerve). In the middle the monster slayers and the paladins bounce, dealing only 13 wounds against the current 25+ nerve of the Guard. The lower abyssals on the hill without ultimate betrayal easily go down. Then, a bit of a surprise in that Gnaeus rolls snake eyes against the gargoyles and they stick around. Plucky Gargoyles.

Forces of the Abyss Turn 3:
So for a moment on the bottom of two I thought I had squirreled my way to victory. My opponent was baited in, he left himself with terrible angles for the Elohi on his turn 3. But his paladins after killing the Molochs sidestepped 3 inches.
That sidestep stopped my comeback cold. Because of the position of the Paladins I could not land in the flank of the paladins in the middle. Then, there was some jostling of miniatures, but we agreed that my Archfiend couldn’t land a charge by his dictator in the middle by a millimeter. I had thought I would have an easy flank charge with the Archfiend into whatever went into the Abyssal Guard, and now I’m sitting here without options.
Without being able to leap his lines into the middle I had a tough problem. The Archfiend doesn’t have enough attacks to threaten the Elohi. If I take the easy flank on Gnaeus, my opponent can tie me down and kill me with one unit of Elohi and fly over/behind my lines with the other unit of Elohi. The Hellhounds pose no threat to the Elohi, so I can’t use them to stop him.
So I have to change plans on the fly but my backup plan is pretty poor. I decide my best bet is to route him in the middle and then turn those units left, and try and keep his Elohi as far on the right flank as possible for as long as possible.
I charge my Archfiend into the Elohi on the far right, hoping to distract my opponent. I have no chance of hurting him, but the Archfiend does look super scary, so I’m hoping she draws attention. However, his paladins on the right are in a good position to go pick up the token on the right, which would free up both Elohi units. I decide to charge Gnaeus with the Hellhounds. I know the Hellhounds don’t threaten Gnaeus, but I’m hoping to draw the paladins into that fight so they don’t get a token. That unit has already basically ruined my whole game.
Regarding the Hellhounds, because my Archfiend can only tie up one unit of Elohi, if I turn to the left now he can send his free Elohi over my lines to threaten the rear of all my units, and still end up on the left. I attempt to cast Ultimate Betrayal on the gargoyles twice, from the Warlock and the Archfiend, but it doesn’t go off either time.
I charge the Molochs up into the Paladin Monster Slayers, looking for the easy kill. I also know I’m out of time, so I aggressively move up with my lower abyssals on the left. I’m hoping to draw in his paladins, live, and then use the paladins to get extra movement with my Molochs to chase down his gur panthers on the left. The dream is still alive, at least if there is a turn 7. I am pretty demoralized that by less than an inch my opponent blocked off my intended moves with the Archfiend.

My warlock in the middle casts another dark pit, impacting 5 units in the middle. I regenerate 5 of the 13 wounds on my Abyssal Guard in the middle, putting them down to 8 wounds. My warlock on the right successfully casts Scorched Earth on the unengaged unit of Elohi.

In combat I start by attacking the Monster Slayers with the Molochs and splitting the attacks with my Guard horde between the Monster Slayers and the paladins regiment. If I can kill them both here I’ve got some options. I do very easily take the Monster Slayers down to double 3s to break and they die, but I only deal a couple wounds to the Paladin regiment and they stand. The Molochs face to the left hoping to follow up charge on the paladin regiment and bounce through. The paladin regiment surviving was a big deal, however, because if I had broken them I could have overrun the Guard Horde into the face of the Dictator.
On the right my Archfiend does the expected 5 wounds to the Elohi, which doesn’t even put them in range where I could break them, and then they heal 1 with iron resolve.
Against Gnaeus I fail hard. The gargoyles, just happy to be alive, do no wounds, although they should only average 1 wound anyway. Then the Hellhounds just had to prove that they still suck. They get 24 attacks, hitting on 4s, then wounding on 4s. I should do 6 damage here, which would not allow me to break Gnaeus, but would allow me to possibly threaten him for another turn. Instead my Hellhounds rolled only 9 hits on 24 dice, and then only a single 4+ on 9 wound rolls. Having done only 1 wound Gnaeus just heals it with iron resolve. My average damage should have been 7 wounds (+1/-1 from dark pit and iron resolve) which would never break him, but I was hoping to threaten him in a future turn. Rubber lancing so hard means I’m still going to have to deal with this character late and I have no chance of killing him either.

Basilea Turn 3
Victory is in Basilea’s grasp. On the left the heroic Gur Panthers continue to run away. Then the left unit of Paladins charge off the hill into the lower abyssals.
On the right both units of Elohi charge the Archfiend, which is what I wanted. They are both stuck on the far right end of the table now, and will struggle to get back into position. My opponent could have easily turned and marched the hindered unit of Elohi into the middle facing the left and I would have no way to stop him. By overcommitting to the Archfiend I have a tiny glimmer of hope.

Also on the right my opponent sends the fresh paladin regiment into help against the hellhounds. This is pretty great for me because it means they are not going off to grab a token, and the hellhounds pose no threat. With those paladins out of position, one unit of invincible Elohi will essentially now be out of the game just sitting on token duty.
In the middle the Dictator charges the side of the Molochs to hold them up for a turn, which probably seals the game regardless.

In combat the paladins on the left deal 7 damage to the lesser abyssals but they hold. The Dictator does 1 damage to the Molochs. The paladins fighting the Abyssal Guard deal negligible damage. Gnaues splits his attacks between the gargoyles and the hellhounds while the paladins strike the hellhounds as well. The hellhounds end up taking 5 damage and the gargoyles die.
Finally the two regiments of Elohi easily kill the Archfiend.

Forces of the Abyss Turn 4
It is the top of 4, and I have basically given up. I don’t have enough turns to catch the Gur Panthers on the left, and I was never going to be able to fight invincible Elohi on the right. It is basically the result I expected at deployment.
I forge on just to roll a few more dice. I get ultimate betrayal off on the lesser abyssal regiment on the left. I get Blessing of the Dark Gods off on the Hellhounds, and they take 3 damage up to 8. They can’t do anything at this point because they bounced so hard last turn, so this is a true desperation play. One unit of Elohi is in the woods so my warlock can’t hide, but I move him to the middle and then fail on casting Bastion.
My warlock in the middle successfully casts Dark Pit on the left.

On the left the lower abyssals fail to do a wound to the paladins so I don’t even get to roll a nerve test. The Molochs easily kill the dictator and then face left. The Abyssal Guard easily kill the middle unit of paladins. They are too slow to get to the gur panthers, so they just face right. The hellhounds rubber lance for a second time in a row despite the order, and only do 4 damage which then gets iron resolved down to 3 damage.
Basilea Turn 4:
It’s all over but the crying now. The Elohi that aren’t holding a token charge and kill my rightmost warlock. The paladins and Gnaeus kill the injured hellhounds, and then for the second time in the game the paladins sidestep to block the movement of the Guard Horde. Despite ultimate betrayal the paladins on the left finish off the lower abyssals. The gur panthers on the left continue to run.

Forces of the Abyss Turn 5:
So there is still one small chance for me to maybe win. If my Molochs charge the Paladins on the left, get a 5” overrun, and the game goes to turn 7 I could catch the Gur Panthers and still get that token.
The Molochs make a hindered charge into the left paladin regiment. The Abyssal guard horde end up healing to just 1 wound taken, and they charge the paladins that ruined my game.

The Abyssal Guard easily kill the paladins. Then the Molochs also easily kill the paladins. Time for that all important overrun roll. I roll a 4, needed a 5, and with that the game is truly over.
At this point we end the game. Samarik will get the much needed supplies, brought to them by the true heroes of the game:

After Game Thoughts:
At the end of the day I had fun, I really like Kings of War. I knew going into the game I only had a tiny chance to pull out a win. With my hail mary move to the middle with the archfiend blocked on turn 3 I just ran out of tools. Who knew a sidestep of 3” instead of 1 or 2 could matter so much? It can be tough playing against fast invincible units, but I felt I did a good job freezing them out on the right for as long as I did.
Perhaps I should have backed up in the trees with my Molochs on turn 2 to force Gnaeus and the windmill Elohi into that charge. Perhaps I should have marched my Hellhounds or Gargoyles to the left on turn 2 and risked the Elohi giving chase. I ended up being just one turn too late. I made a lot of mistakes and did not play my best game ever. I appreciated that my opponent fed me some easy kills with his infantry so I felt like I got to roll some dice. Maybe I had the wrong mindset because I have played this matchup so many times and I knew how it would end before a single die was rolled.
In the end the defenders of Samarik were victorious. Onward to the next battle.
Leave a Reply